Automatic setup of Django 1.4, NGinx and GUnicorn on EC2 using Bellatrix
Some time ago I wrote some lengthy instructions on how to configure Django, NGinx and Green Unicorn on a brand new Ubuntu EC2 instance. Now, I want to show how to automate the same tasks using a command line tool called Bellatrix. We will also provide a Jenkins (formerly Hudson) pipeline, so we have (if we want) a nice display for the UI.
What is Bellatrix?

Bellatrix is a set of (magic) command line utilities for EC2. It wraps the boto library in order to provide a set of easy to use commands that will help you with the most common EC2 operations (start, stop, list, provision, burn, etc.) You can find more information about Bellatrix on this link.
We will use Bellatrix to help us to provision a blank Ubuntu EC2 image (AMI) by using these commands:
1    pip install bellatrix
2    bellatrix start ami
3    bellatrix provision ubuntu_django_nginx_gunicorn.py
4    bellatrix burn instance_id
5    bellatrix terminate instance_id
1. Installing Bellatrix
First, install Bellatrix by typing:
1pip install bellatrix
You can also install Bellatrix inside a virtualenv environment without modifying any of the following steps. Our Jenkins example (published at the end) uses virtualenv on every step.
Now that you have Bellatrix installed, you will need to provide the AWS EC2 credentials in the configuration directory. Please follow these instructions: http://bellatrix.readthedocs.org/en/latest/commands_use_tut.html#setting-your-aws-credentials in order to set your environment.
2. Starting an EC2 instance
We are ready to start an EC2 instance:
1bellatrix start ami-baba68d3 ec2-keypair
Parameters explanation
- ami-baba68d3 is the last Ubuntu Oneiric AMI published in http://cloud.ubuntu.com/ami Just in case you don’t know, an AMI (Amazon Machine Image) is just a snapshot of a pre-configured machine.
- ec2-keypair is the name of the key pair that Bellatrix (and you) will use to connect to your EC2 instance.

For more information on the bellatrix start command can be found here: (http://bellatrix.readthedocs.org/en/latest/commands_use_tut.html#starting-an-ec2-instance)
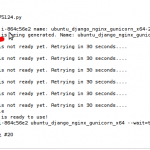
The above command will provide an output like this one:
 1bellatrix start ami-baba68d3 ec2-keypair
 2+ bellatrix start ami-baba68d3 key
 32012-04-01 15:06:15,848 INFO starting EC2 instance...
 42012-04-01 15:06:15,848 INFO ami:ami-baba68d3 type:t1.micro key_name:key security_groups:default new size:None
 52012-04-01 15:06:17,017 INFO starting image: ami-baba68d3 key key type t1.micro shutdown_behavior terminate new size None
 62012-04-01 15:06:17,709 INFO we got 1 instance (should be only one).
 72012-04-01 15:06:17,709 INFO tagging instance:i-864c56e2 key:Name value:Bellatrix started me
 82012-04-01 15:06:21,252 INFO instance:i-864c56e2 was successfully tagged with: key:Name value:Bellatrix started me
 92012-04-01 15:06:21,252 INFO getting the dns name for instance: i-864c56e2 time out is: 300 seconds...
102012-04-01 15:06:41,216 INFO DNS name for i-864c56e2 is ec2-23-20-206-220.compute-1.amazonaws.com
112012-04-01 15:06:41,217 INFO waiting until instance: i-864c56e2 is ready. Time out is: 300 seconds...
122012-04-01 15:06:41,217 INFO Instance i-864c56e2 is running
Please note the DNS name: ec2-23-20-206-220.compute-1.amazonaws.com and the instance id: i-864c56e2 from the output above. We will use both in the commands below. By the way, given the DNS name we can infer the (less verbose) public IP. In this case is 23.20.206.220. I am sure you already got the rule.
3. bellatrix provision
Once you have your instance up and running, it’s time to configure it! Automation here is the key to a reliable output. Our bellatrix provision command will set-up Django, Nginx, Green Unicorn and Upstart in your formerly blank Ubuntu.
First, you need to get the provisioning configuration file:
1wget https://raw.githubusercontent.com/deccico/bellatrix_configs/master/bellatrix_configs/ubuntu_django_nginx_gunicorn.py
If you are interested in getting also the Jenkins jobs for this article or looking at other provisioning examples you can instead clone the whole project:
1hg clone https://github.com/deccico/bellatrix_configs.git
bellatrix provision executes a list of commands. Since every command is just a simple list of Python strings it is very easy to add your own just by looking at the available ones. Bellatrix already provides an interesting set of generic, ready to use commands that cover the most common operations.
- Bellatrix commands: – https://github.com/deccico/bellatrix/blob/master/bellatrix/lib/cmds.py
- bellatrix provision documentation: – http://bellatrix.readthedocs.org/en/latest/commands_use_tut.html#provisioning-an-ec2-instance-or-any-host
Command Execution
Now that you know more about the provision command, is time to execute it:
1bellatrix provision ubuntu_django_nginx_gunicorn.py ubuntu 23.20.206.220 --private_key=~/.bellatrix/ec2.pk
Parameters explanation
- ubuntu_django_nginx_gunicorn.py – Provisioning script. It is possible to execute a configuration inside a directory, so in case you cloned the whole project you can use “bellatrix_configs/ubuntu_django_nginx_gunicorn.py” as this parameter.
- ubuntu – This is just the user name of the remote host.
- 23.20.206.220 – The host where we will execute the provisioning command. We can use the DNS name or the IP that we got in the second step.
- –private_key=~/.bellatrix/ec2.pk - The private key that correspond to the ec2-keypair specified in the start command.
4. Saving your work into a new AMI
Once the provision command performed its magic, we only need to save the current state into a new AMI, so every time we get a new instance from this new AMI the configuration will be ready to use. The command in this case will be:
1bellatrix burn i-864c56e2 ubuntu_django_nginx_gunicorn_x64 --wait=true
Parameters
- i-864c56e2 - Instance id captured in the start command.
- ubuntu_django_nginx_gunicorn_x64 – Name of the new AMI. Bellatrix will add a timestamp to it.
- –wait=true – Burning a instance takes some time. By default the burn command will finish in some seconds after it gets the new AMI code. Nevertheless the AMI won’t be ready until the burning process finishes so if we specify this option, this command will return only when we get the AMI code and the burning process is done .
Documentation about the burn command: http://bellatrix.readthedocs.org/en/latest/commands_use_tut.html#saving-the-state-of-an-instance-into-a-new-amazon-ami
5. Shutting the instance down
After we get the new AMI we can safely terminate the EC2 instance with this command:
1bellatrix terminate i-864c56e2
As noticed here, a terminated instance won’t generate any cost.
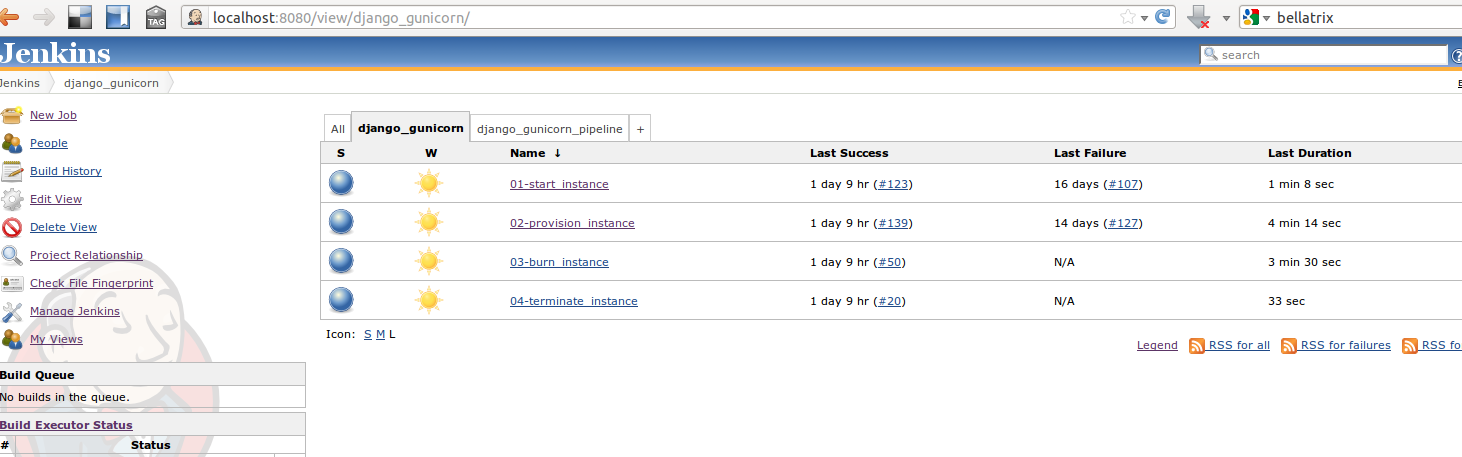
Bonus: Adding some Jenkins magic
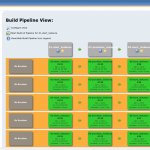
In case you plan to execute these commands more than once (like for any new Ubuntu release) you can find the Jenkins pipeline ready to be used here. Remember to copy the jobs to your Jenkins “jobs” directory and to restart Jenkins afterwards.